
Weigh your dose and your yield, adjust your grind by feel rather than guesswork, and fix your puck prep before you touch anything else. Those three moves fix most bad shots. Get a scale accurate to 0.1 grams, run a short dialing protocol on any new bag, and you’ll land a repeatable recipe in a handful of pulls instead of a week of frustration.
TL;DR:
- Using a scale accurate to 0.1 grams and measuring both dose and yield consistently are crucial for reproducible and improved espresso shots.
- Proper puck preparation techniques such as WDT, level tamping, and verifying distribution prevent channeling, which causes fast, watery shots.
- Adjusting grind size based on taste and extraction time, while fixing dose from the start, allows for more accurate dialing in new coffee bags.
- Water quality with moderate mineral content significantly influences extraction, flavor, and crema formation, making it a key but often overlooked factor.
- Most equipment upgrades have limited impact unless paired with precise technique, especially in grinder adjustment resolution and puck prep practices.
Table of Contents
- How Do You Actually Improve Your Home Espresso Shots?
- Essential Tools and a Quick Pre-Shot Checklist
- A Step-by-Step Protocol to Dial In Any New Bag
- Puck Prep and Tamping: Where Most Channeling Comes From
- Does Water Quality Actually Change the Taste of Espresso?
- Which Equipment Upgrades Actually Improve Your Shots?
- Why Is My Espresso Sour, Bitter, or Running Too Fast?
- How Do You Keep Your Shots Consistent Over Time?
- Sample Recipes and a Practical Home Routine
- A Ritual, Not a Chore
- Which Tri Crow Coffee Blend Fits Your Recipe?
- Sources
- FAQ
How Do You Actually Improve Your Home Espresso Shots?
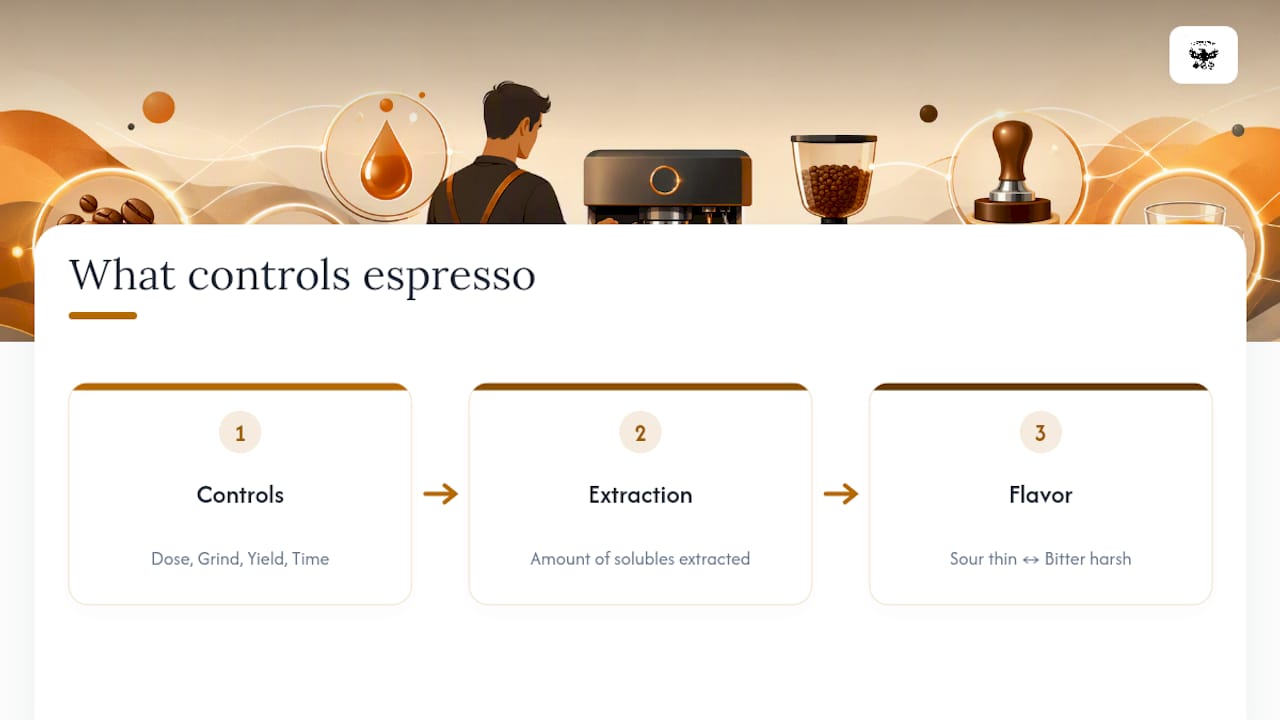
Improving home espresso shots comes down to controlling four variables: dose, grind size, yield, and time. Most bad shots trace back to one of these being off, or to inconsistent puck preparation that throws the whole recipe out the window regardless of how well you dialed in.
Espresso brewing is really just a math problem wearing a coffee costume. You put a measured weight of ground coffee in, water passes through it under pressure, and a measured weight of liquid comes out in a measured amount of time. When people say “espresso extraction,” they mean how much of the coffee’s soluble material ends up in your cup relative to what went in. Too little, and the shot tastes sour and thin. Too much, and it tastes bitter and harsh. The four levers, dose, grind, yield, and time, are how you steer between those two failure states until you land somewhere balanced.
Most home setups fail not because the machine is bad, but because nobody is weighing anything. You can’t fix what you don’t measure, and eyeballing dose or timing a shot by feel is why so many home baristas get inconsistent results from the exact same bag of beans.
Essential Tools and a Quick Pre-Shot Checklist
You don’t need a five-figure setup, but you do need a few specific tools if you want shots that taste the same on Tuesday as they did on Monday.
- A scale accurate to 0.1 grams. This is non-negotiable. Integrated machine timers and dose sensors are notoriously unreliable, and weighing dose and yield directly is the single biggest jump in consistency most people can make.
- A burr grinder with fine adjustment resolution. Blade grinders can’t produce the even particle size espresso demands.
- WDT needles, 0.35 to 0.4 millimeters. These break up clumps before tamping.
- A flat, well-fitting tamper sized to your basket.
- A dosing cup or funnel to catch stray grounds during distribution.
- Clean baskets, free of old coffee oil buildup.
Before every shot, run this sequence: warm the machine and group head, purge a small amount of water, weigh your dose into the basket, distribute and WDT, tamp level, then tare your scale under the spout before pulling. Each step removes one source of variance. Skip the warmup and your first shot runs cold. Skip the WDT and you get channeling. Skip taring the scale and you’re timing a shot with no idea what your actual yield was.
A Step-by-Step Protocol to Dial In Any New Bag
Here’s the workflow that gets most beans into a usable recipe within two to four shots. Fix your dose at the start of the process and avoid adjusting it during the initial dial-in shots.
- Set your dose. Weigh 18 grams into the basket as a baseline for a standard double shot. This number stays fixed while you adjust everything else.
- Set your target yield. Start with a 1:2 ratio, meaning roughly double the liquid weight out for the coffee weight in. This is the industry’s standard starting ratio, not a rigid rule, but it’s the right place to begin.
- Pull the shot and weigh the yield while timing it. A common target window runs 25 to 32 seconds, with some guides extending that to 35 seconds depending on roast and grinder.
- Taste it. Sour and thin usually indicates underextraction; try grinding finer. Bitter and harsh usually indicates overextraction; try grinding coarser. If the shot ran fast (under 25 seconds) with the right yield, that also points to grinding finer.
- Adjust one variable, then purge. Change the grind setting only. After any grinder adjustment, purge 5 to 8 grams of coffee through before your next real shot so you’re not pulling a shot with mixed grind sizes stuck in the burrs.
- Repeat until taste and time align, then lock the recipe. Write down dose, grind setting, yield, and time.
The order matters. Changing grind and yield in the same round leaves you unable to tell which adjustment caused which result. A four-shot protocol is usually enough to land in the right zone for a given bag, at which point taste becomes the final judge, not the stopwatch.
Pro Tip: Keep a small notebook or notes app entry for every new bag: roast date, dose, grind setting, yield, and time. When you open a new bag from the same roaster three months later, you’ll already know roughly where to start instead of dialing in from zero.
One thing that trips people up: a shot running fast doesn’t always mean the grind is too coarse. Sometimes it means the puck has a channel, a weak spot where water found a shortcut through the coffee bed instead of pushing through evenly. That’s not a grind problem. That’s a puck prep problem, and no amount of grind adjustment will fix it.
Puck Prep and Tamping: Where Most Channeling Comes From
Channeling, that fast, watery, unevenly extracted shot, is usually a technique problem, not a recipe problem. Before you touch the grinder, redo your puck prep.
- WDT first. Use 0.35 to 0.4 millimeter needles and stir through the grounds in a cross pattern down to the bottom of the basket, breaking up every clump. This single step prevents more bad shots than any hardware upgrade you could buy.
- Level the bed before tamping. A tilt of just 2 to 3 degrees creates a thin side where water rushes through first.
- Tamp level, not hard. Consistent, flat pressure matters far more than raw force; pushing beyond roughly 33 pounds of tamping pressure adds nothing to the shot.
- Use a bottomless portafilter to diagnose. Watch the spray pattern. A single strong jet or splitting stream means uneven distribution. An even, gentle “mousetail” pour means you nailed it.
Pro Tip: If your bottomless portafilter shows a jet shooting off to one side in the first five seconds, that’s almost always a distribution problem, not a grind problem. Redo the WDT before you change anything else.
Does Water Quality Actually Change the Taste of Espresso?
Yes, water composition measurably affects both extraction and flavor, and it’s one of the most overlooked variables in a home setup. Water for extraction research shows that hardness, alkalinity, and total dissolved solids (TDS) all shape how efficiently coffee compounds dissolve and how bitterness comes through in the cup.
Water is arguably the second most important ingredient in your cup after the beans themselves, since its mineral content directly influences how sour, sweet, or bitter a shot tastes even with an identical recipe.
- Avoid straight tap water if your area has very hard or heavily chlorinated supply; it can flatten flavor or introduce off notes.
- Avoid extreme demineralized or reverse-osmosis water without remineralization; stripping out minerals entirely can mute extraction and even affect crema stability.
- Prefer a filtered or lightly mineralized bottled water with moderate hardness and alkalinity.
Water quality doesn’t just affect flavor, it affects how crema forms. Comparative testing across different bottled waters found measurable differences in CO2 degassing and TDS shifts during extraction, meaning the water brand you grab off the shelf can visibly change your crema and mouthfeel.
For temperature, start around 93°C (200°F) at the group head. Push a couple of degrees hotter for very light roasts, which need more heat to extract fully, and pull it a couple of degrees cooler for darker roasts, which extract faster and can turn bitter or burnt-tasting if the water runs too hot. Learn more about how water shapes coffee flavor if you want the deeper chemistry behind these numbers.
Which Equipment Upgrades Actually Improve Your Shots?
Grinder quality beats machine price almost every time. A $400 grinder with fine, stepless adjustment will get you further than a $2,000 machine paired with a mediocre grinder.
- Grinder adjustment resolution matters more than brand prestige. If your grinder only offers coarse steps, you’ll struggle to hit that 25 to 32 second window with any precision.
- Match your basket to your dose. A basket rated for 18 to 20 grams won’t perform the same with a 15-gram dose crammed in or a 22-gram dose overflowing it.
- Precision baskets (the ridged, straight-walled kind sold as upgrades for many stock portafilters) tend to reduce channeling compared to older stock baskets with tapered walls.
- Purge after every grind adjustment and after long idle periods. For grinders with heavy retention, purge 8 to 15 grams when switching beans entirely.
- An external 0.1 gram scale isn’t optional. It’s the cheapest, highest-impact purchase you can make, and it matters more than any grinder or machine upgrade on this list.
For grinder selection and burr types specifically, Tri Crow Coffee’s grinding guide for home baristas walks through what to look for at different price points.
Why Is My Espresso Sour, Bitter, or Running Too Fast?
Every bad shot has a symptom you can read and a likely cause behind it. The trick is figuring out whether the fix is technique, recipe, or equipment, because grinding finer won’t fix a channeling problem, and redoing your tamp won’t fix stale beans.
| Symptom | Likely cause | First fix |
|---|---|---|
| Sour, thin, watery | Underextraction | Grind finer; check bean freshness |
| Bitter, harsh, burnt | Overextraction or water too hot | Grind coarser; lower temperature slightly |
| Shot runs too fast | Channeling or grind too coarse | Redo WDT and tamp level first |
| Shot runs too slow | Grind too fine or stale/old beans | Grind coarser; check roast date |
| Blonde, pale crema | Old beans or low pressure/temperature | Check roast date; check machine cleanliness |
| Uneven, spurting stream | Distribution or tamp tilt | Redo WDT; verify tamp is level, not tilted |
A useful rule of thumb: if the shot is inconsistent between two pulls with the identical recipe, that’s almost always technique (distribution or tamp), not the recipe itself. If every shot from a bag is consistently wrong in the same direction, that’s the recipe, grind, yield, or temperature. And if a bag that used to taste great now tastes flat and fast regardless of what you adjust, check the roast date before touching anything else. Coffee that’s degassed too long loses the resistance that slows water flow, and shots start running fast no matter how fine you grind.
- Fast, blonde crema, flat taste? Suspect stale beans first.
- Slow, muddy, bitter shots from a machine that hasn’t been cleaned in weeks? Suspect built-up coffee oil in the group head and basket before you touch the grind.
How Do You Keep Your Shots Consistent Over Time?
Consistency is a logging problem as much as it’s a technique problem. Every time you open a new bag, note the roast date, your dose, grind setting, target yield, and shot time. Without that record, you’re re-dialing from scratch every single time, which wastes beans and patience.
- Purge after any change. 5 to 8 grams after a grind adjustment; more after switching beans entirely.
- Clean baskets and the group head regularly. Built-up coffee oil turns rancid and bleeds bitterness into every shot afterward, even with a perfect recipe.
- Run a quick calibration pull each morning. One blank shot through the group head, followed by a quick weighed pull, helps stabilize temperature and grinder behavior before your first real shot of the day.
Pro Tip: Log grind settings by the actual click number or dial position on your grinder, not by vague terms like “medium fine.” A specific number is something you can return to in three weeks; “medium fine” isn’t.
For a broader set of daily habits worth building into your setup, see Tri Crow Coffee’s premium coffee tips for a better home brew.
Sample Recipes and a Practical Home Routine
Two starting points worth trying, both landing near a 1:2 ratio before you adjust to taste.
- Balanced medium roast recipe: 18 grams in, 36 grams out, targeting 28 to 30 seconds, water around 93°C (200°F). Works well as a baseline for most medium roasts.
- Bold, darker roast recipe: 18 grams in, 32 to 34 grams out (closer to 1:1.8), targeting 25 to 27 seconds, water closer to 91 to 92°C. Darker roasts extract faster and turn bitter quickly if you push the yield or temperature too high.
A short prep routine worth adopting: weigh your dose the night before if you’re brewing early, let the machine fully warm up (not just the “ready” light, actually five to ten minutes idle at temperature), and always run your calibration shot first. On roast age, most beans taste their best somewhere between 7 and 21 days after the roast date, once initial degassing settles but before the coffee starts losing brightness.
A Ritual, Not a Chore
Dialing in isn’t a task you finish once and forget. It’s closer to tuning an instrument you play daily, small adjustments, repeated attention, a little patience with yourself when a shot runs sour for no obvious reason. The home baristas who improve fastest aren’t the ones with the best equipment. They’re the ones who log what they did, taste with real attention instead of habit, and change one thing at a time instead of three.
There’s something worth defending in that slowness. A rushed shot pulled on autopilot rarely tastes as good as one where you actually paid attention to the grind, the tamp, the timer. Treat the process as a small morning ritual rather than a hurdle between you and caffeine, and the shots tend to get better almost as a side effect.
— David P.
Which Tri Crow Coffee Blend Fits Your Recipe?
If you want a starting point that pairs naturally with the recipes above, consider choosing small-batch roasted coffee, which is intended to maintain consistent flavor from the first pull to the last, reducing flavor drift often found in mass-produced roasts.
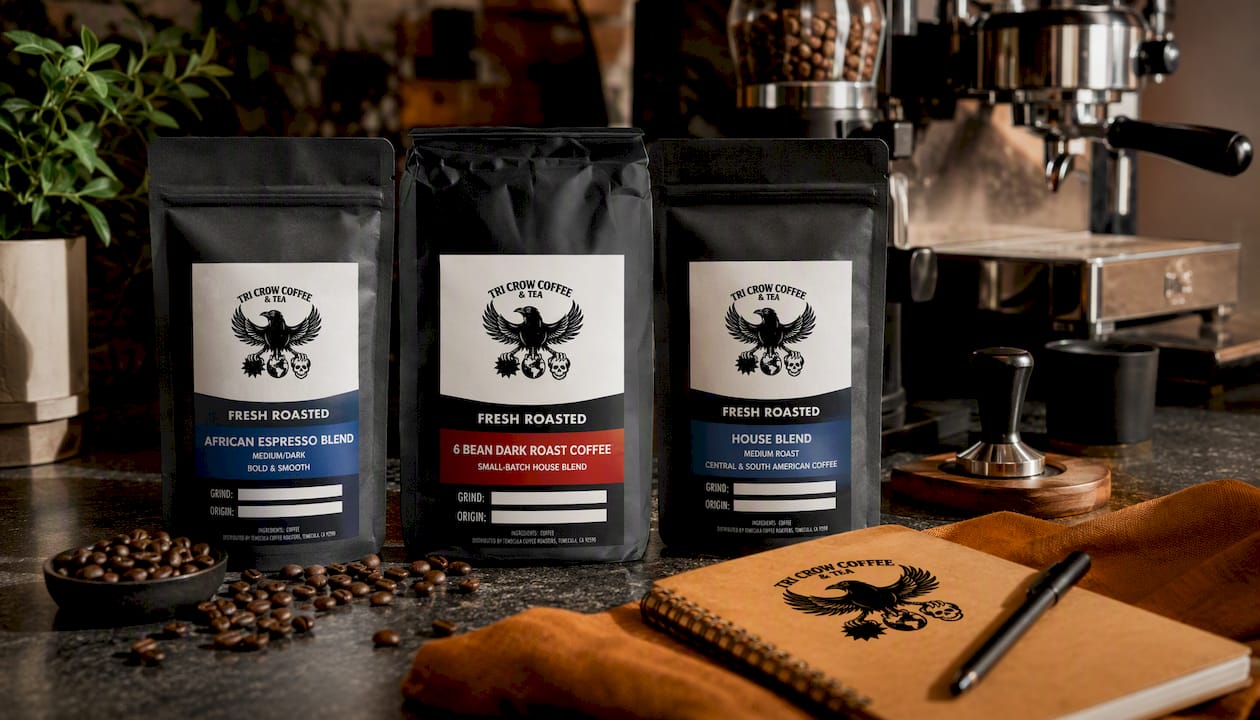
For the balanced, medium-roast recipe, start with the House Blend, Medium Roast, a Central and South American profile that responds well to a straightforward 1:2 ratio around 28 to 30 seconds. If you prefer the bolder, darker style with a shorter yield, the African Espresso Blend is built for that, bold and smooth with enough body to hold up at a tighter 1:1.8 ratio. And if you want something heavier and more syrupy for longer, slower sipping, the 6 Bean Dark Roast small-batch house blend brings more depth to a fuller-bodied shot.
Whichever blend you pick, check the roast date on the bag before you buy and let it rest seven to ten days before pulling your first dialing shots. Head to the Tri Crow Coffee shop to browse current batches and grab a bag while it’s fresh.
Sources
For readers who want to go deeper on the technical side, the BrewedBarista step-by-step dial-in guide covers the numbered protocol in more detail, while the water composition and treatment paper breaks down exactly how hardness and alkalinity interact with extraction chemistry. Tri Crow Coffee’s own guide on coffee extraction rounds out the fundamentals for anyone still building a mental model of what extraction actually means.
- How to dial in espresso: step-by-step — BrewedBarista
- Espresso puck prep: WDT & leveling/tamping guide — BrewedBarista
- Water for extraction—composition, recommendations and treatment — Coffee Science / ResearchGate
FAQ
How Do You Improve Espresso Shots at Home?
Weigh your dose and yield with a 0.1 gram scale, fix puck prep with WDT and a level tamp, then adjust grind size in small steps until your shot lands in the 25 to 32 second window at a 1:2 ratio.
How Do You Make High-Quality Espresso at Home?
Start with fresh beans rested 7 to 21 days past the roast date, use filtered water with moderate hardness, and run a reproducible dialing protocol rather than eyeballing dose and time.
What Is the 30-Second Rule for Espresso?
It refers to the rough target extraction window many baristas use, generally around 25 to 32 seconds for most roasts, though some guides extend that up to 35 seconds depending on the bean and grinder.
How Do You Make Homemade Espresso Stronger?
Tighten your ratio by pulling less yield for the same dose, for example dropping from 1:2 to around 1:1.8, and grind slightly finer, but taste after each change since “stronger” achieved through overextraction just tastes bitter instead of bold.